Simply Cuties
Challenge #184
Good day, fellow crafters. Today I present to you my entry into The Cutie Pie Challenge Blog’s most recent challenge, #184. The theme for this challenge was “Simply Cuties” and to be honest I didn’t realize that this type of imagery went by that name. The term “Cutie” typically refers to a cute, adorable, or charming character(s) or illustrations that are commonly featured on greeting cards, usually cute animals, cartoon characters, or other endearing figures that evoke positive emotions and are designed to appeal to a wide range of recipients. Their inclusion is to make cards more visually appealing and to convey warm and friendly messages for various occasions, such as birthdays, holidays, or special events. The use of "cuties" aims to create a sense of joy, affection, and nostalgia, which can make the card-giving experience more delightful for both the sender and the recipient. I hope you enjoy.
To create this card I first began by creating the sky background panel. On a piece of white cardstock, I placed my favorite cloud stencil along the top and then used some Distress Oxide in Uncharted Mariner along with an ink blending brush to fill in the color. As I became happy with an area I moved the stencil down the page to a new area and repeated the process. The next step was to subdivide my space into thirds and establish where I wanted my ground level to be for my Cutie to stand. Once that was determined I utilized my blades of grass stencil, some Distress Oxide in Mowed Lawn, and an ink blending brush to create the grass. The last step to create the background panel was to add some specialty paper in the lower third with some cute little flowers on it.
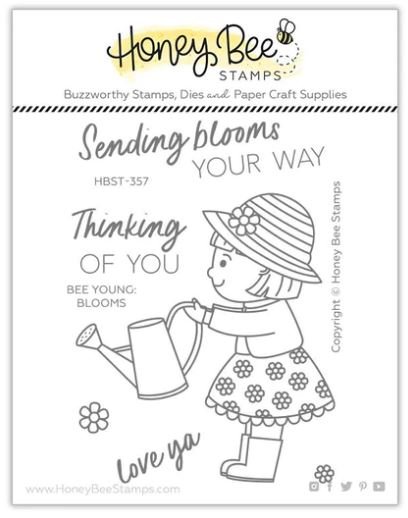
To create the Cutie I chose the Honey Bee Stamp Bee Young: Blooms stamp and die set. I stamped the images out onto a piece of white Hammermill paper and then used Copic markers, colors can be seen in the gallery, to color in my images. I next used the die set to cut the images out. If you like this set, you might want to try and find it sooner rather than later as it is being retired.
The last step was assembly. I trimmed my background and a black mat for visual interest, to their final dimensions using a rounded corner rectangle die and then adhered them to a pre-cut A2 white card base. I also rounded the corners on the card base. The Cutie and the flowers were then added directly onto the background. Wrapping it all up was the sentiment which was stamped from the same set as the Cutie in a black pigment ink.


