Shaker Christmas
Run Up to Christmas - Week 12
Good day, fellow crafters. Welcome to the #runuptochristmashop2023 hosted by @love_smile_and_craft and @kellys.craft on Instagram. We have been making a card each week for the last 11 weeks in our run-up to Christmas and this is week number 12 and will be the last cards made for this hop. The theme this week is "Shaker Christmas", something fun and our way of saying thank you for joining. We hope everyone has a wonderful Christmas and wish you all the best for 2024. I hope you enjoy my submission.


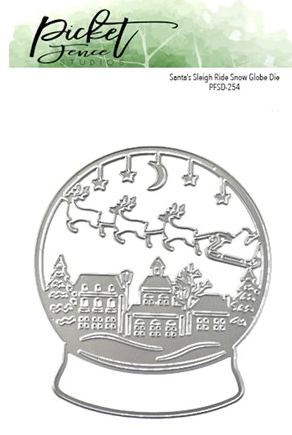
This card was a tremendous amount of work the way I decided to construct it but so worth it when you see the final product. Let me explain, you see, the Picket Fence Studio Santa Sleigh Ride Snow Globe die, featured left, is pretty intricate and I wanted this particular element to truly shine as the focal point of my shaker design. Initially, I considered the conventional approach of using foam tape to construct the inside walls, as I typically would for a shaker card. However, I found that this method not only displeased me aesthetically but also resulted in a card that lacked sturdiness. Consequently, I opted for an alternative construction method, which I will detail below.
To begin, I measured the snow globe die against my Hero Arts Circle dies until I identified one of matching size. I then used a piece of white cardstock and Distress Oxide in the color Tumbled Glass and an ink-blending brush to craft my night sky and then I used the circle die to cut it out. To that base layer, I next die cut out, stacked adhered seven layers of white cardstock together using Bearly Art liquid glue. For the shaker elements, I used some tiny iridescent stars from my collections and Fun Stampers Journey Confetti Sparkle Elements Clear Sparkle inside of the shaker. I made sure to put some in both of the “wells” made by this construction method to get full coverage. I followed this up by adding two more layers of white cardstock of which all of the color for the card was added to the topmost layer using my Copic markers. The final step for the snow globe was to add some clear embossing ink along the edges and then adding some WoW! Silver embossing powder which I set with my heat tool.
The next step was to add the sentiment. For this, I chose to use a blue cardstock background panel, Spellbinders Faux Happy Holidays Glimmer plate, featured right, along with silver hot foil. For success with foiling, I highly suggest that you experiment with your machine. For instance, my Spellbinders Hot Foil System works best after I have heated it a minimum of three heating sequences before it transfers well.
The last step was assembly. I trimmed the blue background panel down to its final dimensions and then adhered it to a pre-cut and folded white card base. Lastly, I adhered the snow globe into place with more liquid glue. With that, I called the card complete.
Note: Please be aware that I don't have any sponsorship arrangements with the suppliers mentioned in this post; I simply appreciate and frequently use their products. To support the creation of more content like this, I've included affiliate links for some of the featured supplies. Utilizing these links won't incur any additional costs for you, but it does provide a small benefit to me, allowing me to continue sharing my work with you.


