Perfect Poinsettia
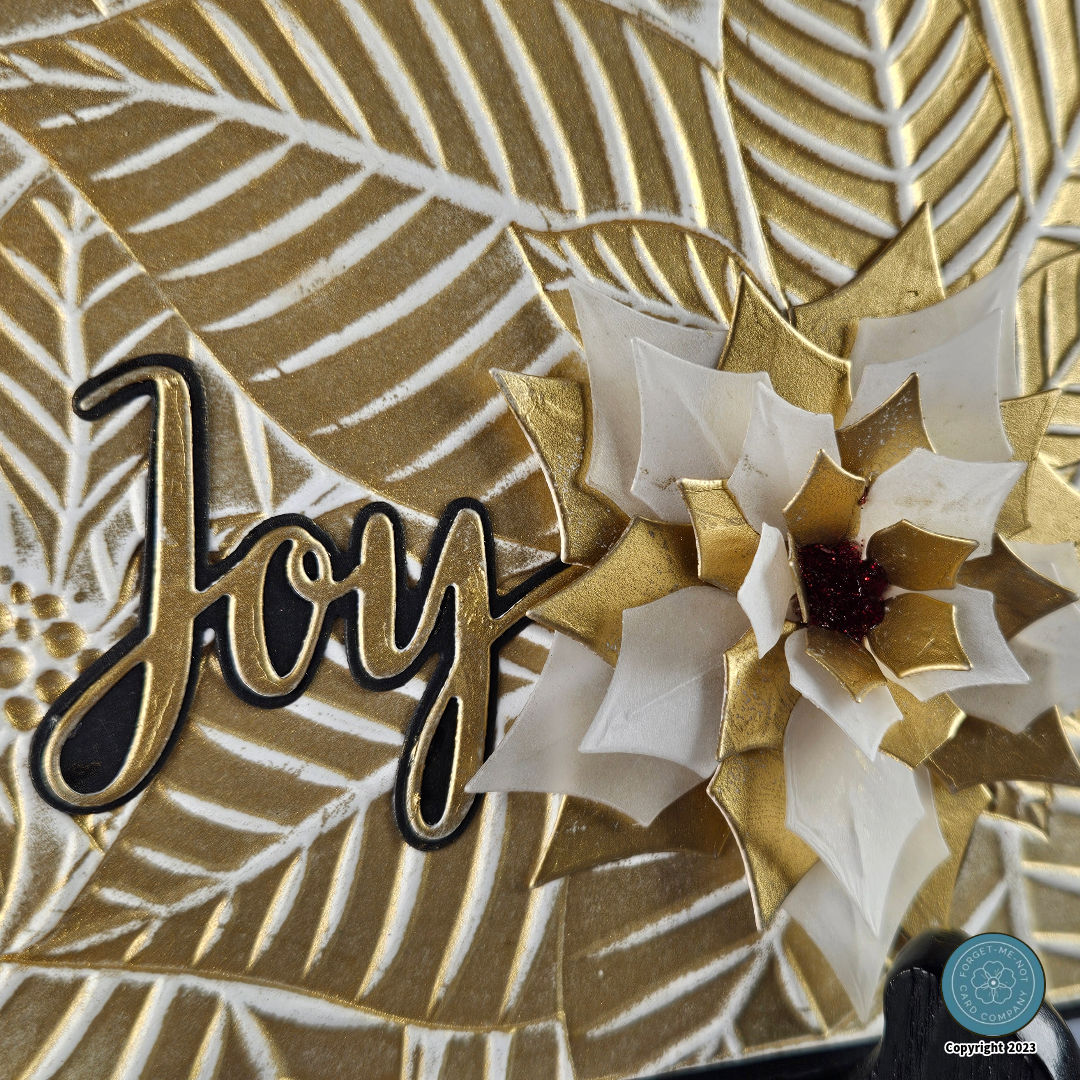
Good day, fellow crafters. Today I present to you my most recent creation, made just in time to be sent out for the holidays. In crafting a golden Christmas card that emanates joy, we embrace the warmth and splendor of the season. The rich hues of gold, coupled with the delicate translucence of vellum, come together to create a stunning canvas for our heartfelt sentiments. This card, adorned with an intricate poinsettia, serves as a timeless expression of the festive spirit. As we extend our wishes for joy and merriment, the intricate design reflects the care and thoughtfulness embedded in each handmade creation. This holiday, may the golden glow of the season illuminate hearts with the essence of celebration and happiness. I hope you enjoy.
To create the background for this card, I first began with collecting the supplies, white cardstock, Altenew Antique Gold pigment ink, and the Perfect Poinsettias embossing folder also from Altenew which is featured on the left. The technique I used was to pounce the Antique Gold ink pad on the flat debossing side of the embossing folder, place my cut to fit white cardstock onto the embossing side of the folder, and then carefully shut the folder to not get smeared ink and then I ran it through my Gemini die cutting machine. I finished off the background panel by adding some Perfect Pearls to add some shimmer. This technique makes the debossed side pop. I then set the background panel aside to allow it to dry. Take note, if you have not worked with pigment inks before they do take quite a bit longer to dry than other kinds so be sure to be careful in your manipulations of whatever you have used the ink on so that you don’t inadvertently smear the ink.
The next step was to create the gorgeous poinsettia that is on the card. I began with some white cardstock and the Spellbinders Layered Poinsettia die set, featured right, to cut out one complete flower. Then I used the Antique Gold ink pad to color all the pieces. I set them aside and allowed them to dry fully. While that was occurring I used the same die set and some vellum to cut out another full flower. Using liquid glue, I then assembled the poinsettia with alternating layers of gold and then vellum petals being sure to offset them as I went as well as give each layer a slight curl for dimension. To finish the bloom off I used some Pops of Color in red glitter for the center.
The last element to create was the sentiment. For this I used the Simon Says Stamp Joy wafer die set, featured left, cutting the sentiment from white cardstock first and then inking it with the same Antique Gold. Then as to not waste material I cut the sentiment shadow out of a sheet of black that I used to create the mat. Once the gold was dry I adhered the two pieces together.
The final stage was assembly. I trimmed the black mat I mentioned down to its final dimensions and then with double-sided tape, adhered the background panel to it. I then adhered the composite to a sized-matched white card base in the same way. I then positioned my poinsettia and sentiment where I wanted them and adhered them into place with liquid glue. With that, I called the card complete.
Note: Please be aware that I don't have any sponsorship arrangements with the suppliers mentioned in this post; I simply appreciate and frequently use their products. To support the creation of more content like this, I've included affiliate links for some of the featured supplies. Utilizing these links won't incur any additional costs for you, but it does provide a small benefit to me, allowing me to continue sharing my work with you.


